
Coffee and tea staining is a simple way to dye paper, fabric, or ribbon for a rustic, vintage feel. You brew a strong cup or fill a pan, brush or dip your material, then let it dry. Layering builds depth, and small tweaks change tone, from honey beige to moody sepia. It’s budget-friendly, since you can use pantry staples and scrap materials. It’s eco-friendly compared to harsh dyes, and it’s beginner-friendly. Kids can help with supervised steps, and makers at any level can control the look with easy adjustments. Grab a cup, brew a little extra, and let’s start. A few minutes and a few tools are all you need.
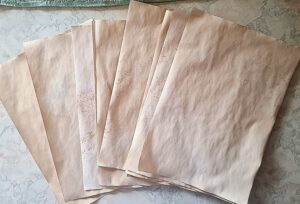
What Is Coffee and Tea Staining and Why Try It at Home
People have used steeped leaves and brewed beans to tint materials for centuries. Tea gave books a sun-faded look in old libraries. Coffee warmed fabrics with earthy browns long before store dyes were common. Today, you can get that same vintage feel with items you already own. Coffee brings rich, warm browns. Think sepia photos and soft caramel. Tea gives subtle yellows, beiges, or soft greys, depending on the type. Black tea leans gold to tan, green tea is pale and fresh, and strong Earl Grey can tip to ash-grey. These tones suit journaling, scrapbooking, and DIY décor, since they add age without looking fake. It is simple, fast, and forgiving. You can stain paper, cotton napkins, or ribbon, with a mug, a tray, and a spoon. Kids can help with dipping and dabbing, and you can test swatches in minutes. The best part is how it adds personality. Each drip, tide line, or speckle tells a small story.
The Science Behind the Stains
Here is the easy version. Tea has tannins, which love to cling to fibers and paper. Coffee has acids and natural color that soak in and deepen as it dries. When hot liquid meets porous surfaces, color slips into tiny gaps. As water evaporates, pigment stays behind. On paper: coffee dries in darker pools with bold edges. Tea gives softer washes and even tone. Heavier watercolor paper drinks more and shows fewer streaks. On fabric: coffee makes deeper browns on cotton and linen. Tea creates gentle beige with a vintage, sun-kissed feel. Silk takes color fast, while polyester resists both. With layers: more dips equal more depth. Let pieces dry between coats for richer color that looks natural. Think of it like staining wood. The surface soaks up what it wants, then sets the rest as it dries.
Gather Your Simple Kitchen Tools for Staining Success
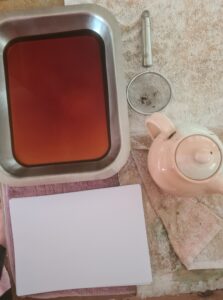
You can set up a staining station with zero new purchases. A few basics make brewing, dipping, and drying smooth and repeatable. Here are the go-to items and why they work:
- Baking tray or sheet pan: Perfect for dipping paper or small fabric. The rim holds liquid and keeps mess in one place.
- Old spoons: Stir, ladle, and flick speckles. Use a tablespoon for scooping and a teaspoon for edge work.
- Jars or heat-safe mugs: Brew strong amounts and store extra stain. Glass makes it easy to judge colour. Use lids if you plan to keep it for a day or two.
- Paintbrushes or foam sponges: Brush on edges, fill corners, and control depth. Foam gives smooth coverage; bristle brushes add texture and streaks.
- Coffee filters or a mesh strainer: Remove grounds and tea leaves for cleaner baths. Filters catch fine particles that can leave grit on paper.
- Drying rack/Drying area: Air flows around the piece for even drying. Set over a towel to catch drips.
Prep your tools in minutes:
- Cover your surface with an old towel and place your tray on top
- Label jars as “stain only” and store them away from food gear.
- Work with hot liquid carefully. Let brews cool a bit before dipping.
- Wear gloves if your skin is sensitive. Coffee and tea can dry it out.
Brewing Your Stain:
Coffee vs. Tea Basics A strong brew is your base color. The darker the brew, the deeper the stain. Use more product, hotter water, and longer time for richer tones. Keep notes as you go so you can repeat results.
Coffee methods: Instant coffee: 1 to 2 tablespoons per 1 cup hot water. Stir to dissolve. Add more for near-sepia. Brewed grounds: 2 to 3 tablespoons coarse grounds per 1 cup water. Simmer 3 to 5 minutes, then steep 10 minutes off heat. Strain well.
Tea methods: Black tea: 3 to 5 bags (or 2 tablespoons loose) per 1 cup boiling water. Steep 10 to 20 minutes for gold to tan. Longer times add warmth and depth. Green tea: 2 to 3 bags per 1 cup hot water, not boiling. Steep 3 to 5 minutes for a light, fresh beige. Longer times can dull the tone. Earl Grey: 3 to 4 bags per 1 cup boiling water. Steep 8 to 12 minutes. Produces soft gray-brown with a slight cool cast.
Coffee gives bold browns and dramatic edges, great for vintage tags and fabric depth. Tea brings softer, even tones and a gentle aged look, perfect for journal pages and delicate textiles. Mix both if you want warm base layers with crisp coffee details on top.
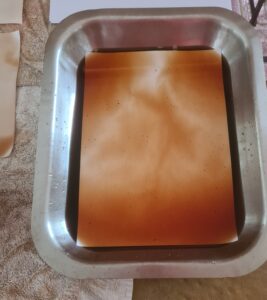
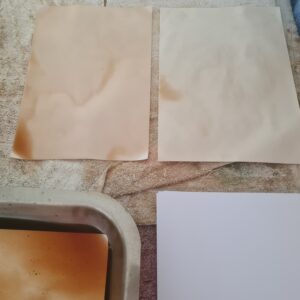
Submerge, agitate gently and leave for up to 30 minutes. Very carefully, lift out with your hands, let excess drip, then lay flat. Paper can tear easily so a light hand is required. I have torn many pages but still use them as tag bases, little folded notebooks or smaller folded pages in a journal. For tea, expect a calm, even wash. For coffee, expect slightly darker edges.
Brushing for patterns and control: Load a soft brush, then sweep in long strokes for smooth fields of color. Edge-darkening: run a stronger coffee mix along borders for a soft frame. Splatter: tap a loaded brush for specks. Works well over a dry tea base.
Sponging for texture Use a foam sponge or kitchen sponge for mottled, vintage texture. Dab lightly to avoid harsh squares. Rotate the sponge for a natural look.
Dry Air dry 30 to 90 minutes, depending on thickness and room airflow. Oven dry at 180 to 200 F, 5 to 12 minutes. Watch closely to avoid crispy edges.
Optional for paper: iron flat on low to medium heat. Optional for fabric: heat set with an iron for 3 to 5 minutes on cotton setting.
Fun Project Ideas to Get Started
Start small and build confidence. These beginner projects show great results with little effort.
- Stained bookmarks: Dip cardstock, then sprinkle salt for speckles. You get cozy tones that make simple pages look loved.
- Vintage tags: Brush edges with strong coffee for dark borders. Tie with twine for gifts, pantry jars, or party favors.
- Journal pages: Light tea wash adds a soft base for handwritten notes. Coffee gives that dark vintage feel.
- Fabric napkins: Soak cotton in a mild coffee bath for warm beige. The color hides minor stains and gives a farmhouse vibe.
Thanks for reading and spending time here. Ready to try your first batch at home? I would love to know how you go. Small projects build skill fast, and your next cup can be your next colour.


