When you start Junk Journalling, you will find you have a huge amount of scrap paper cluttering up your desk. Don’t throw any of it away, there are so many uses they can be put to.

Here are 5 ways you can use up your scrap paper:

1. Clusters

Paper clusters are a great way to add texture and interest to your junk journal pages. They are also a great way to use up small scraps of paper that might otherwise be discarded.

  1. Gather your materials: You will need a variety of scrap paper in different patterns, colors and sizes, scissors, glue or adhesive, and any other embellishments you would like to add (like ribbon, buttons, etc).
  2. Cut your paper: Cut or tear your scrap paper into small squares or rectangles. The size of the pieces will depend on the size of the cluster you want to create. You can also use punches to create shapes like circles or stars.
  3. Arrange the paper: Start arranging the paper pieces with different arrangements until you find one you like. I like to place them one on top of the other at angles.
  4. Secure the paper: Once you are happy with the arrangement, use glue or staple to attach the paper pieces to one another. Be sure to apply enough glue to hold the pieces together, but not so much that it makes the cluster bulky. If using staples, I like to then cover that with a glued on embellishment.
  5. Add embellishments: If desired, you can add embellishments like ribbon, buttons, or other decorative items to your cluster. Be careful not to add too much, as you don’t want to overpower the cluster. Generally, one or two small pieces of ribbon and a button or other small embellishment will be enough.
  6. Allow the cluster to dry: Once the glue is dry, your paper cluster is ready to use in your junk journal. You can attach it to a page using more glue or adhesive, use it as a standalone decoration on the page, attach to the top of a tag instead of ribbon, add it to a journal card, or use it to cover an area. They are great to add interest or a focal point to a page. The possibilities are endless.
  7. Repeat the process: Repeat the process to make as many paper clusters as you want to use in your junk journal. You can use different color schemes or patterns to create different effects.

2. Pockets

Paper pockets are a great way to add functionality and organization to your junk journal. They can be used to store small items like tickets, photos, tags, or journal cards. This is good for large scraps of paper. Here is a simple tutorial for how to make paper pockets for your junk journal:

  1. Gather your materials: You will need scrap paper, scissors, glue, and any other embellishments you would like to add (like ribbon, stickers, etc).
  2. Cut your paper: Cut your scrap paper into the size and shape you want for your pocket. Check against the page you want to place it on.
  3. Glue the pocket: Use glue to secure the the pocket in place. Remember to only glue 3 sides – each side and the bottom.
  4. Add embellishments: If desired, you can add embellishments like ribbon, stickers, or other decorative items to your pocket. You can also use a circular hole punch to make a half circle in the top of the pocket.
  5. Allow the pocket to dry: Once the glue is dry, your paper pocket is ready to start filling with ephemera. You can use ticket stubs, photos, tags, journal cards, little note books, the possibilities are endless.
  6. Repeat the process: Repeat the process to make as many paper pockets as you want to use in your junk journal. You can use different patterns or colors of paper to create different effects.

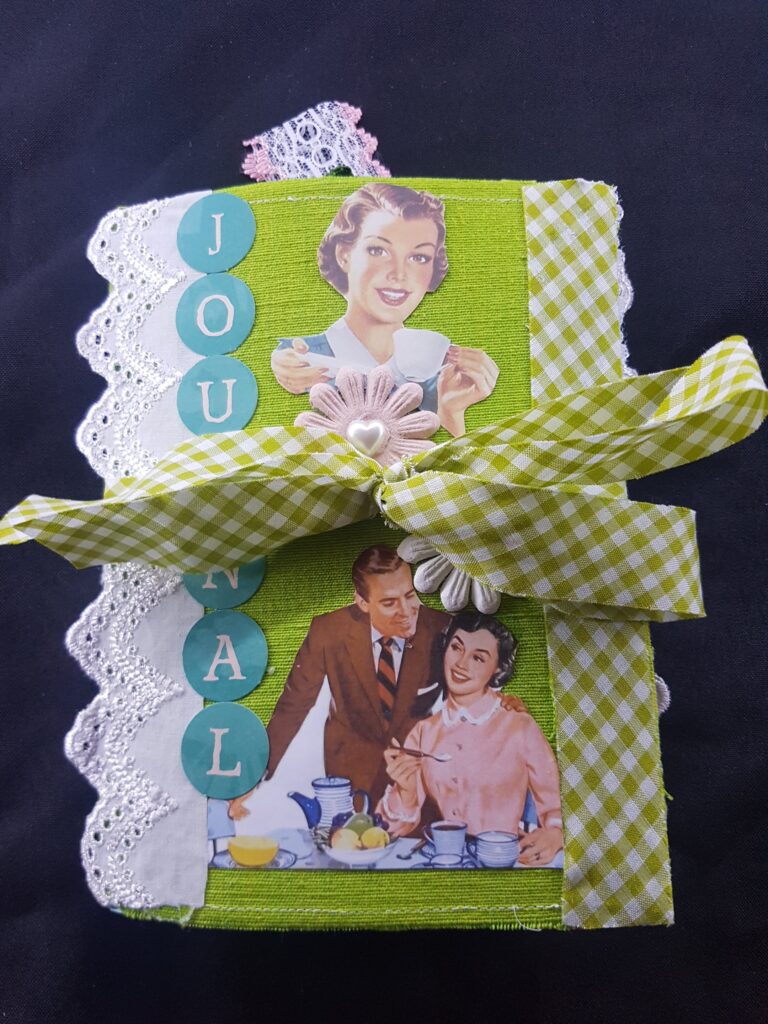
3. Covering Tags and Journal Cards

Covering tags and cards with scrap paper is a great way to add interest and personality to your junk journal. It’s also a great way to use up small scraps of paper that might otherwise be discarded. Here is a simple tutorial for how to cover tags and cards with scrap paper for your junk journal:

  1. Gather your materials: You will need a variety of scrap paper in different patterns, colors and sizes, tags or cards (with one blank side), scissors, glue, and any other embellishments you would like to add (like ribbon, buttons, etc).
  2. Cut your paper: Cut your scrap paper into small squares or rectangles that are slightly larger than your tags or cards. The size of the pieces will depend on the size of the tags or cards you are covering.
  3. Apply glue: Apply a thin layer of glue to the front of the tag or card.
  4. Adhere the paper: Carefully place the scrap paper square or rectangle onto the glue, smoothing out any bubbles or wrinkles. Press down firmly to ensure a good bond.
  5. You can also use a sewing machine to sew around the edges. I use a glue stick to glue the paper onto the tag or card. Take it to your sewing machine and sew around the edges to secure. You can use a straight stitch or zig zag or any other fancy stitch you may have.
  6. Trim the paper: Use scissors to trim the excess paper around the edges of the tag or card.
  7. Add embellishments: If desired, you can add embellishments like ribbon, buttons, or other decorative items to your covered tag or card.
  8. Allow the tag or card to dry: Once the glue is dry, your covered tag or card is ready to use in your junk journal.
  9. Repeat the process: Repeat the process to cover as many tags or cards as you want to use in your junk journal. You can use different patterns or colors of paper to create different effects.

By covering tags and cards with scrap paper, you can create customized elements that add interest and personality to your junk journal. Tags and cards are great for writing on the back or using for gifts. Tuck them into pockets or paperclip onto the pages. The possibilities are endless.
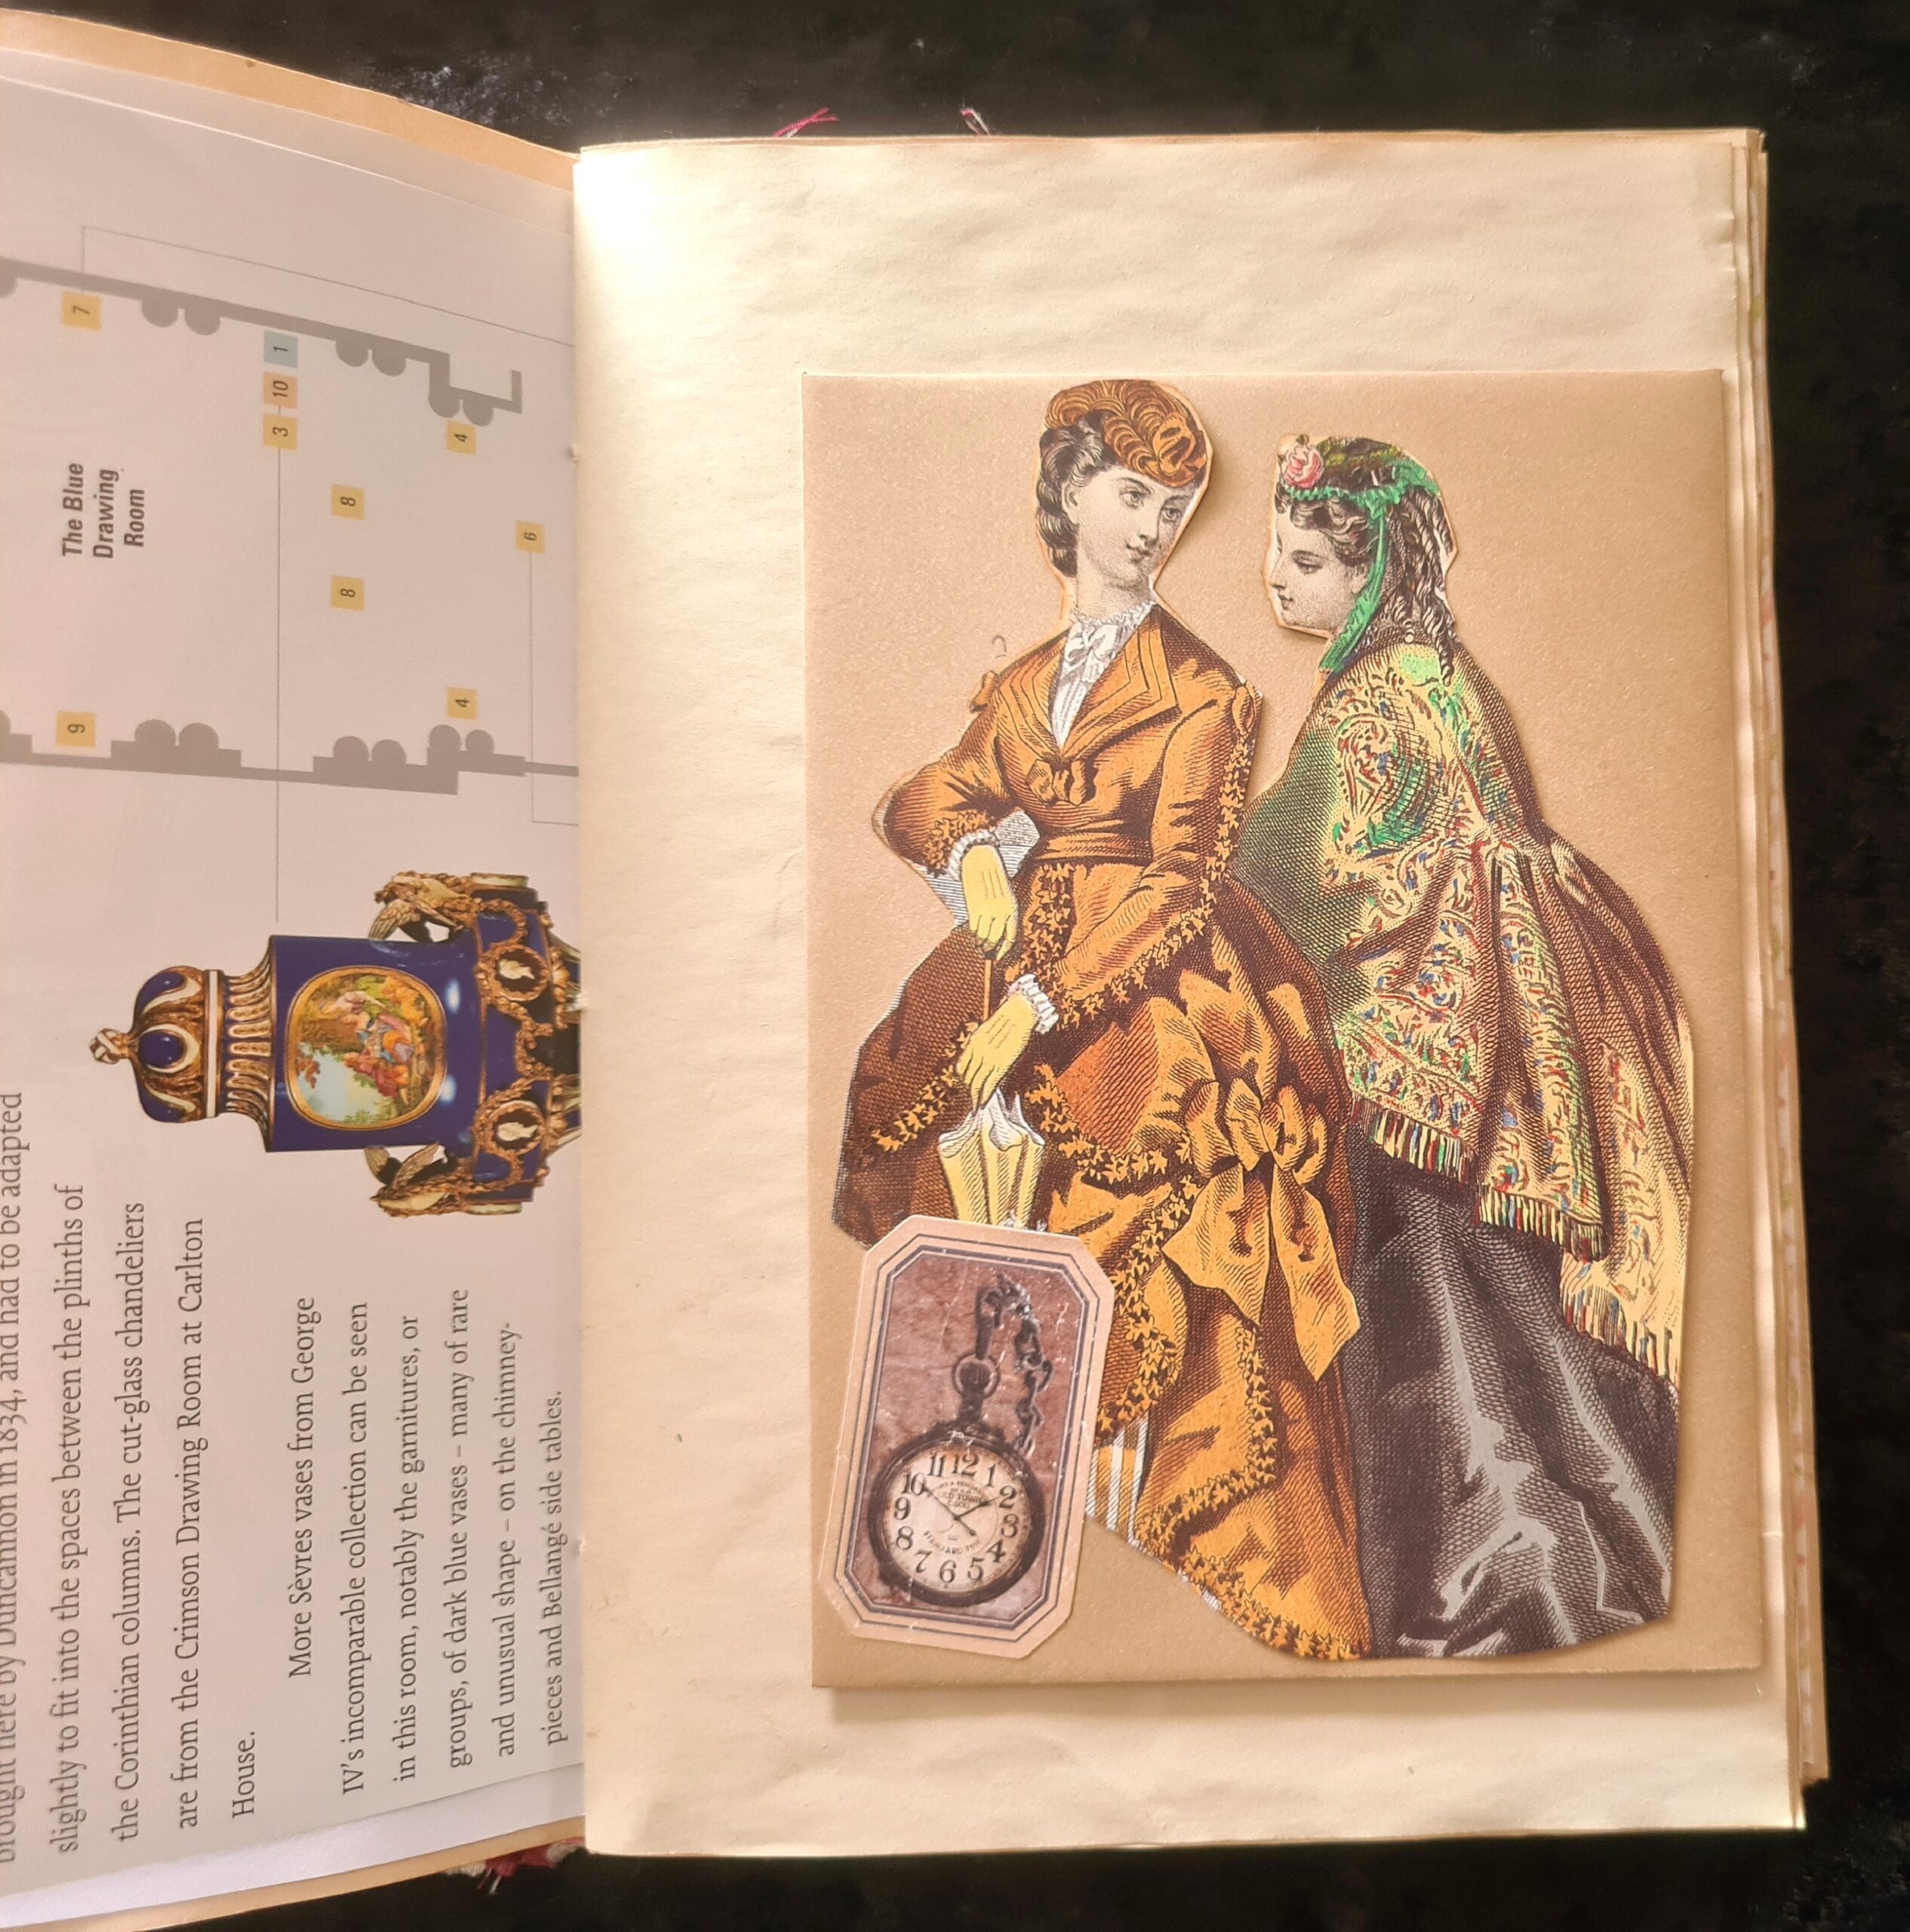
4. Collaging

Collaging with scrap paper is a great way to add visual interest and texture to your junk journal pages. It’s also a great way to use up small scraps of paper that might otherwise be discarded. Here is a simple tutorial for how to use scrap paper as collage in your junk journal:

  1. Gather your materials: You will need a variety of scrap paper in different patterns, colors and sizes, scissors, glue, and any other embellishments you would like to add (like ribbon, buttons, etc).
  2. Cut your paper: Cut your scrap paper into small squares or rectangles of various sizes. You can also use punches to create shapes like circles or stars.
  3. Arrange your paper: Begin arranging the paper pieces on your work surface in a pleasing composition. You can experiment with different arrangements until you find one that you like.
  4. Glue the paper: Once you are happy with the arrangement, use glue to attach the paper pieces to your journal page. Be sure to apply enough glue to hold the pieces together, but not so much that it makes the collage bulky.
  5. Add embellishments: If desired, you can add embellishments like ribbon, buttons, or other decorative items to your collage. Be careful not to add too much, as you don’t want to overpower the collage.
  6. Allow the collage to dry: Once the glue is dry, your collage is ready to use in your junk journal. You can use it as a background or as a focal point on a page.
  7. Repeat the process: Repeat the process to create as many collages as you want to use in your junk journal. You can use different color schemes or patterns to create different effects.

Collaging with scrap paper is a great way to add visual interest and texture to your junk journal pages. It’s also a great way to use up small scraps of paper that might otherwise be discarded. You can use collages to create backgrounds, or focal points, I like to cut up the pages and turn them into pockets and journal cards. Pictured below is a page I turned into 1 pocket and 2 journal cards.

5. As a background

Using scrap paper as a background on pages in your junk journal is a great way to add interest and personality to your journal, using up small scraps of paper that might otherwise be discarded. Here is a simple tutorial for how to use scrap paper as a background on pages in your junk journal:

  1. Gather your materials: You will need scrap paper, scissors, glue, and any other embellishments you would like to add (like ribbon, buttons, etc).
  2. Cut your paper: Cut your scrap paper or tear it, into the size and shape you want for your background. Tearing the paper and then going around the edges with distress ink gives it an old, vintage look.
  3. Apply glue: Apply a thin layer of glue to the back of the scrap paper.
  4. Adhere the paper: Carefully place the scrap paper onto the page of your junk journal, smoothing out any bubbles or wrinkles. Press down firmly to ensure a good bond.
  5. Add embellishments: If desired, you can add embellishments like ribbon, buttons, or other decorative items to your background, such as pictures.

You can use different patterns or colors of paper to create different effects and moods on your journal pages. It can also help you to theme your journal or make specific pages or sections stand out.

Now you have 5 different ways to use your scrap papers, it is time to have some fun. I would love to see what you come up with!

Similar Posts

Leave a Reply

Your email address will not be published. Required fields are marked *